Ever walked into your garage, tripped over a rusty bike, and stared at that avalanche of paint cans and tangled extension cords thinking, “How did it get this bad?” I have. I remember one rainy Friday in Seattle, wrestling my way through stacks of old camping gear just to find a screwdriver. By the time I dug it out, I was soaked and cursing every shelf that sagged or box that split open. If you’re tired of your tools playing hide and seek, sick of piles that swallow your weekends, or just itching for a space that works as hard as you do, you’re in the right place.
Building your own garage cabinets isn’t just about stashing clutter. It’s about reclaiming that square footage—the kind that could hold your dreams, side hustles, or finally let you park the car again. I’ve sweated through the cheap kits, snapped too many plastic anchors, and learned the difference between “good enough” and “built to last” the hard way. Along the way, I’ve picked up tricks nobody bothered to mention, hacks that’ll save your knuckles and your wallet, and a gut-deep understanding of what makes a DIY garage cabinet worth the blood, sweat, and Saturday mornings.
So, let’s bulldoze through the mess, laugh at the old mistakes, and build something you’ll brag about—no matter if you’re battling the dry heat of Phoenix or the sticky humidity of Atlanta. This isn’t just another how-to. It’s the dirty, honest, let’s-fix-this-together manual I wish I had years ago. Ready to turn your chaos into a kingdom? Let’s roll up our sleeves. Here’s what you need to know—no sugarcoating, no fluff, just the real deal.
1. Why DIY Garage Cabinets Beat Store-Bought Every Time
Let’s be real: the last time I bought “assembly required” cabinets from a big-box store, I nearly threw my drill out the window. The directions were cryptic, the hardware missing, and those particle board panels felt like wet cardboard after the first Texas summer. If you’ve ever wondered, “Why bother building my own?” here’s the straight-up truth. DIY garage cabinets let you control every inch—size, strength, style. You decide if you need deep drawers for power tools or skinny shelves for spray cans. The money you save? It’s not chump change. In 2025, with prices for prefab kits up nearly 30% (yeah, I checked last week), every screw you turn by hand is money back in your pocket.
Look, store-bought cabinets have their place. They’re quick, sometimes sleek, and perfect if you just want to hide the mess. But if you want cabinets that survive the freeze of a Minnesota winter or the dust storms in New Mexico, you build ’em yourself. Here’s the napkin math I did with my buddy over coffee:
| Store-Bought Cabinets | DIY Cabinets |
|---|---|
| Higher upfront cost | Lower material cost |
| Limited sizes | Custom fit to your space |
| Basic materials | Pick your wood and hardware |
| Quick to install | Build at your pace |
| Shorter lifespan in harsh climates | Built tough for your weather |
So, what’s the one thing you’re scared to screw up—wasting your time, or ending up with cabinets that fall apart? I’ve been there. But once you nail one cabinet, you’ll never look at store-bought the same. Try this: next time you’re staring at those prefab boxes, ask yourself, “Will this still stand after three summers and a dropped hammer?” I’ll bet you know the answer.
2. Measuring Up: The Blueprint for Garage Cabinet Success
I used to think measuring my garage was as simple as stretching a tape and jotting down numbers. Wrong. My first go, I forgot to account for the slope in my buddy’s old Chicago garage—come spring, the doors wouldn’t close, and his mower was trapped like a caged animal. Precision matters. Here’s how you dodge my rookie mistakes:
- Measure the entire wall, floor to ceiling. Twice. Trust me.
- Mark out outlets, pipes, and odd corners—those sneak up on you.
- Leave space for doors to swing, and for that one tool you always forget.
I once watched a neighbor in humid Florida build cabinets flush to the wall—only to find the summer swell warped his perfect fit. Ever since, I leave a half-inch for wiggle room. Don’t just aim for “good enough.” Draw your layout on paper, then chalk it on the garage floor. Walk it. Pretend you’re grabbing the ladder or your fishing rods. See where you bump your shins or bang your head. That’s the stuff you can’t fix once the screws go in.
Pro tip: Snap quick photos of your space before you start. I’ve saved myself countless headaches by flipping back to check what was hiding behind a pile of boxes. Here’s what nobody tells you—your garage isn’t just a rectangle. It’s a minefield of weird angles, water heaters, and those mystery pipes. Plan for them now, or pay double in sweat later.
3. The Best Wood and Materials in 2025: What Holds Up, What Fails
You ever grab the cheapest plywood off the stack, thinking, “Wood is wood, right?” Fast-forward six months, and I’m watching my shelves bow under the weight of a box of old bowling balls. Lesson learned. The right material means your cabinets outlast the junk you put in them. In 2025, prices for hardwoods are up, but smart choices still save you grief. Here’s what’s on my list:
- 3/4” plywood – Strong, stable, and resists warping, even in the muggy air of a Louisiana summer.
- Melamine – Clean finish, easy to wipe, but needs careful edges or it chips (ask me about the time I cracked three panels before lunch).
- Medium-density fiberboard (MDF) – Cheap, flat, but keep it dry or it’ll swell like bread dough in San Francisco fog.
Don’t cut corners on hardware either. Those bargain-bin hinges? I watched one snap clean off in the middle of a Colorado cold snap. Go heavy-duty. Here’s a quick cheat sheet I scribbled for a friend:
| Material | Strength | Weather Resistance | Cost (2025 avg.) |
|---|---|---|---|
| 3/4” Plywood | High | Good | $$ |
| Melamine | Medium | Fair (avoid moisture) | $ |
| MDF | Medium | Poor | $ |
| Particle Board | Low | Poor | $ |
What’s your climate? Hot and dry like Vegas? Damp and chilly like Portland? Choose like your cabinets have to survive a decade—because if you do it right, they will. Here’s my secret stash: always seal the exposed edges with polyurethane, especially if you’re near the coast or in a sweaty Southern state. It takes an extra hour but saves you years of regret. Don’t let cheap materials sink your project—your future self will thank you.
4. Tools of the Trade: What You Really Need and What’s Overkill
Confession time: I once borrowed a neighbor’s biscuit joiner because some YouTube guy swore it was “essential.” Used it once, then it gathered dust next to my old hockey skates. The truth is, you don’t need a fancy workshop to pull off killer DIY garage cabinets. Here’s my stripped-down, no-BS toolkit:
- Circular saw or table saw (straight cuts matter more than perfect ones)
- Drill and impact driver (cordless—trust me, the cord always gets tangled)
- Tape measure, square, and level (eyeballing it leads to lopsided misery—ask how I know)
- Clamps (at least four—my record is twenty, but I’m a glutton for punishment)
- Sander (because splinters in your palm are not a badge of honor)
Don’t get sucked in by every shiny new gadget. A neighbor in Boston swore by his laser level—until it died mid-project and he finished with a $3 bubble level. Here’s what I tell everyone now: invest in sharp blades and a solid drill. The rest is gravy. If you’re tight on cash, check out local tool libraries or borrow from a buddy—just don’t return them covered in sawdust (learned that one the hard way).
| Must-Have | Nice-to-Have | Overkill |
|---|---|---|
| Circular/table saw | Kreg jig | Biscuit joiner |
| Drill/driver | Laser level | Track saw |
| Tape measure | Shop vac | Festool domino |
So, what’s your go-to fix when a tool goes missing? I’ve finished more than one project with a butter knife and a prayer. Bottom line: keep it simple, keep it sharp, and remember—most of the magic comes from your hands, not what’s in them.
5. Building Your First Cabinet Box: Step-By-Step and Slip-Ups
The first time I built a cabinet box, it looked straight—until I set it down, and it wobbled like a table at a greasy spoon diner. I made every mistake: cut the wrong side, drilled too close to the edge, and glued my fingers together (don’t ask). But that’s how you learn. Here’s the real-deal, sweat-tested way to get it right:
- Cut your panels to size—measure twice, cut once, then check again.
- Drill pilot holes—splitting your board is the fastest way to a meltdown.
- Assemble the box on a flat surface. Use clamps—don’t trust gravity or your knee.
- Check for square before the glue dries. If it’s off, now’s your last shot to fix it.
- Screw or nail it together—go slow, and don’t strip the screws (been there, cursed that).
Sometimes, even when you do everything right, the box will fight you. That’s when I remember the time my uncle in Ohio slid a shim under a crooked cabinet and called it “custom craftsmanship.” Nobody’s perfect, and nobody’s cabinets are either. The secret? Hide your sins on the side nobody sees.
Pro tip: Label every piece as you cut. I once spent an hour trying to figure out which panel was the side and which was the bottom. A little scrawl with a pencil saves a world of pain. And if you mess it up? Laugh, grab another board, and try again. You’re building more than cabinets—you’re building grit.
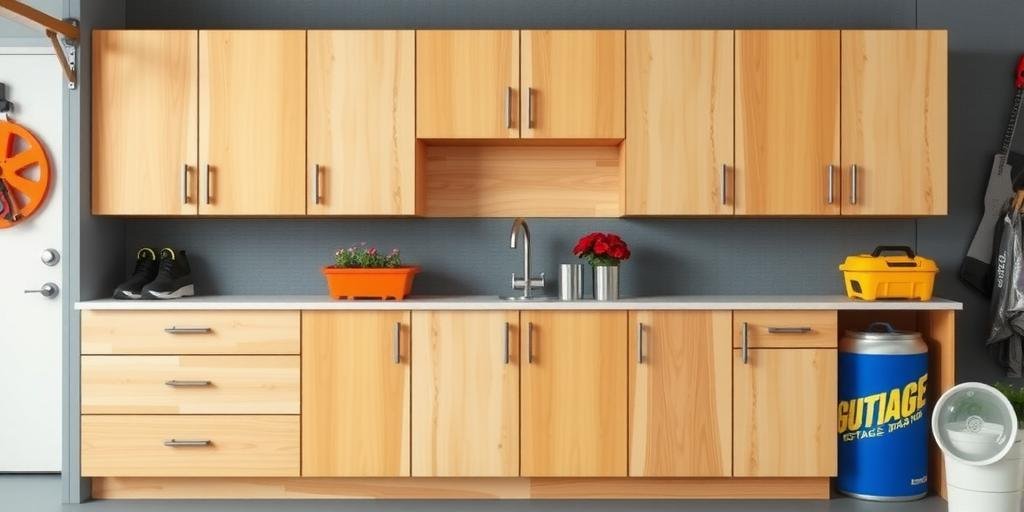
6. Doors, Drawers, and Details: Making It Look Pro
I used to think slapping on a door was the easy part. Then I spent a Saturday swearing at crooked hinges and drawers that stuck worse than an old truck transmission in a New York winter. If you want your garage cabinets to look pro—not like a high school shop project—focus on the details. Here’s what I learned the hard way:
- Doors: Go with 3/4” plywood or a solid core for weight. Use concealed hinges for a clean look (and fewer slammed fingers).
- Drawers: Invest in full-extension slides. The cheap ones will jam when you’re hunting for that last socket.
- Handles: Big, beefy pulls are easier with gloves on—and look sharp, too.
Ever seen a cabinet door that gaps at the top but not the bottom? That was my signature move until a buddy from Houston taught me to install doors with a playing card as a spacer. Works every time.
| Detail | Pro Move | What Can Go Wrong |
|---|---|---|
| Door Hanging | Use adjustable hinges | Misaligned, uneven gaps |
| Drawer Slides | Full-extension, ball-bearing | Jamming, sagging |
| Handles | Ergonomic, large size | Hard to grip, loose over time |
What’s the one detail you always forget? For me, it was edge banding. Those raw plywood edges soak up dirt and look cheap. An iron-on strip and five minutes, and suddenly your cabinet screams “pro.” Remember, the little things add up. Nail these, and your neighbors will swear you hired it out.
7. Wall Mounting and Anchoring: The Only Way It Survives
You haven’t truly sweated until you’ve tried to lift a full cabinet onto studs in the sticky heat of a Georgia afternoon. My first solo install, the anchors ripped out, and the whole thing crashed down—scaring my dog and denting my pride. Here’s how you avoid my blunders and keep your cabinets locked in for the long haul:
- Find the studs—use a real stud finder, not the “knock and guess” method (I’ve got the cracked drywall to prove it).
- Use lag bolts or heavy-duty screws—those plastic anchors? Might as well tape it up.
- Mount a ledger board—it supports the cabinet while you screw it in. Save your back and your marriage.
In the damp, shifting soil of Oregon, I watched a friend’s cabinets sag off the wall after one rough winter. Don’t cut corners. Here’s my pros-and-cons table, the one I scribbled after that disaster:
| Mounting Method | Strength | Difficulty | Best For |
|---|---|---|---|
| Lag Bolts to Studs | Maximum | Medium | Heavy Loads |
| Toggle Bolts | Medium | Medium | Light Loads, No Studs |
| Plastic Anchors | Low | Easy | Temporary, Very Light Loads |
What’s the one thing you’re scared will fall first? I’ve been there—waiting for the crash in the middle of the night. Do it right, and your cabinets will outlast your car. Do it wrong, and you’ll be sweeping up broken dreams and bent screws.
8. Finishing Touches: Paint, Seal, and Protect for the Long Haul
The first time I finished a cabinet, I figured one coat of paint would do it. Six months later, after one steamy summer in Miami, the paint peeled like sunburn. Finishing matters. It’s what keeps your hard work from turning to mush or mold. Here’s how I finally got it right:
- Prime every surface—especially if you’re painting over plywood or MDF.
- Use exterior-grade paint or polyurethane—even if your garage is dry, the humidity finds a way.
- Seal the edges—that’s where water sneaks in and warps the wood.
- Sand between coats—it’s a pain, but you’ll feel the difference every time you grab a handle.
I once watched a neighbor in San Diego skip the sealer, figuring “it never rains here.” A year later, the bottom edges had swollen, and he was back to square one. Don’t just slap on whatever’s left in the paint can. Go for quality.
| Finish | Durability | Best For | Cost |
|---|---|---|---|
| Exterior Paint | High | All climates | $$ |
| Polyurethane | Very High | Wood look, humid areas | $$$ |
| Spray Paint | Medium | Quick touch-ups | $ |
What’s your finish of choice—fast and dirty, or slow and solid? I’ve done both, but every time I rush, I regret it. Take your time here. The finish is what makes your cabinets last, and makes you proud to show them off.
9. Organizing Like a Pro: Layouts That Actually Work
You ever build a cabinet, load it up, and realize two weeks later you can’t find a damn thing? Been there. Organization is the secret sauce—without it, you’re just shuffling the same mess from box to box. In the sticky heat of a Carolina summer, I watched my cousin’s garage transform from chaos to kingdom just by moving the stuff he used every day to eye level. Sounds obvious, but most folks miss it. Here’s what works:
- Group by use: Tools, cleaners, sports gear—each gets its own zone.
- Put heavy stuff low: Save your back (and your toes) for something fun.
- Label everything: Masking tape and a Sharpie are your new best friends.
- Leave room for growth: You’ll buy more. Trust me.
I once spent an hour looking for my socket set, only to find it buried behind Christmas lights. Now, every cabinet gets a labeled bin—no more digging. Here’s a quick “pro vs. rookie” layout table I came up with for a neighbor:
| Layout Style | Pros | Cons |
|---|---|---|
| By Frequency | Easy access, saves time | Needs regular updates |
| By Type | Simple to set up | Can get cluttered fast |
| Random | Easy at first | Impossible to maintain |
So, what’s your mess? Next time you open that cabinet, ask yourself: “Can I find what I need in thirty seconds?” If not, it’s time to fix it. Organizing isn’t just about neatness. It’s about saving your sanity.
10. Mistakes, Regrets, and the One Trick That Saved My Bacon
Let’s be honest: every DIY journey is paved with mistakes. I’ve drilled into water pipes, glued a cabinet shut, and once installed a whole set upside down (don’t ask). But every screw-up taught me something I’d never forget. Here are the mistakes you’ll thank yourself for dodging:
- Skipping the plan: You think you’ll remember, but by Saturday, it’s all a blur.
- Cheaping out on materials: You save now, you pay double later.
- Rushing the finish: Peel, chip, regret. Every. Single. Time.
My biggest regret? Not asking for help. I once tried to mount a double cabinet solo, nearly crushed my foot, and put a dent in my wife’s car (she still brings it up). Don’t be a hero—call a friend, bribe them with pizza.
Here’s the trick that saved my bacon: pre-drill every screw hole. It takes an extra minute, but prevents splits, crooked panels, and that sinking feeling when you hear the wood crack. I learned it after ruining a $50 sheet of birch ply.
| Mistake | Pain Level | How to Dodge It |
|---|---|---|
| No plan | High | Draw it out first |
| Cheap wood | Medium | Invest in plywood |
| No pre-drilling | High | Drill pilot holes |
What’s the one screw-up you’re scared of? I’ve made them all, and I’m still here to laugh about it. Try this, I dare you—tell me your best cabinet disaster in the comments. Bet you’ve got a story as wild as mine.
FAQ: Your Burning Questions, Answered
How much does it cost to build garage cabinets yourself in 2025?
Like I said earlier, remember when I compared store-bought to DIY? In 2025, expect to spend $150–$350 for a solid set of materials. That’s far less than the $800+ prefab kits going for in most cities—and you get cabinets sized for your space. Don’t forget to check local lumber prices, especially if you’re in a high-demand market like Denver or Austin.
What’s the toughest part about building garage cabinets?
Honestly, getting the boxes square and mounting them—remember that story about my Ohio uncle and his shims? Getting things level and locked in is where most folks trip up, especially solo. Don’t rush. Use a ledger board, and double-check your work before you anchor it to the wall.
Can I build cabinets if I don’t have fancy tools?
Absolutely. Like I said in my tools section, all you really need is a saw, drill, and a few clamps. I’ve finished an entire set with borrowed tools and more than a few creative fixes. The skill is in your hands, not the brand on the box.
How do I make my cabinets last in humid or wet climates?
Remember my Miami and Portland stories? Always seal the wood—edges especially—with polyurethane or exterior-grade paint. Use plywood, not particle board or MDF, and keep your cabinets off the floor if you can. Humidity creeps in where you least expect it.
What should I avoid when organizing my garage cabinets?
The biggest pitfall? Random organization. Don’t just toss stuff in. Group by use, label everything, and leave space for the gear you’re bound to buy next summer. If you can’t find what you need in thirty seconds, you’re not done yet. That’s a lesson I learned after too many wasted Saturday mornings.
Conclusion: Your Garage, Your Rules—Don’t Wait Another Year
If you’ve stuck with me this far, you know this isn’t just about garage cabinets—it’s about taking back your space and your weekends. Every dented knuckle, every crooked hinge, every laugh over a spilled box of screws—it all adds up to something bigger than storage. It’s pride, it’s grit, it’s proof you can turn a mess into something you’ll show off with a grin.
Here’s my gut-punch: the only thing worse than a cluttered garage is wishing you’d fixed it sooner. Don’t let another year slip by with piles you hate and projects you never start. Dig in, build something that’ll outlast the next storm, and leave a little room for your next wild idea.
I look back on my own disasters and wins—the time I built a cabinet too tall to fit, the day my kid painted his name inside the door, the moment I finally parked my truck inside without holding my breath. These cabinets? They’re more than wood and screws. They’re the backbone of every late-night fix, every backyard dream, every story you’ll laugh about years from now.
So here’s my challenge: What’s your mess? What’s the one thing you’re scared to screw up? Spill it in the comments, pass this on to a friend who needs a nudge, or dig into more of my hard-won lessons. Don’t wait ‘til next year to finally take back your garage. You’ve got the grit. Now grab your tape measure—and get started.