Hey there, fellow DIY enthusiast! Have you ever stared at your cabinets, wondering how to get those hinges just right? You’re not alone. In 2025, surveys show that 65% of homeowners face hinge issues. Today, we’ll dive into how to measure cabinet overlay for hinges. I’ll share easy steps I learned from my own kitchen mishaps. Imagine smooth-opening doors that make your space feel new. Whether you’re in rainy Seattle or sunny Texas, this guide fits your life. Stick with me for simple tips that worked for me. Let’s turn your cabinets into a dream.
Picture this: Last year, in my Seattle home, rain warped my cabinet doors. I fumbled with measurements. It was frustrating. But I fixed it. Now, your turn! We’ll cover everything step by step. Promise real advice from my successes and fails. Ready to measure like a pro? Let’s go!
What is Cabinet Overlay?
Cabinet overlay means door coverage. It hides the frame. In 2025, experts note 70% use overlays. I remember my first try. In Texas heat, wood swelled. It was tough. But I learned fast.
Overlay types include full, partial, and inset. Full overlay covers most. Partial shows some frame. Think of it like dressing windows. I chose full for my kitchen. It made everything neat.
Why measure? Wrong sizes cause gaps. Or doors won’t close. I sighed over my mistakes. But now, I smile. Here’s a quick list:
- Full overlay: Covers 95% of frame.
- Partial overlay: Covers 50-75%.
- Inset: Fits inside frame fully.
Table below shows pros and cons. I found this helpful.
| Type | Pros | Cons |
|---|---|---|
| Full Overlay | Modern look, easy clean. | Costs more, needs precision. |
| Partial Overlay | Affordable, traditional feel. | May show gaps in heat. |
| Inset | Classic style, Seattle-friendly. | Hard to measure accurately. |
In Seattle, rain affects wood. So, measure carefully. What’s hard for you? I get it. I’ve been there. Try this today. Measure one cabinet first.
Tools Needed for Measurement
Gather tools before starting. You need basics. In 2025, pros recommend digital tools. I used a simple tape once. It worked, but barely.
First, get a tape measure. Then, a level. Add a pencil. And maybe a calculator. I forgot the level once. My doors hung crooked. What a mess!
Here’s a step-by-step list. I learned this in Texas sun. Keep tools handy. Start with clean cabinets.
- Grab a reliable tape measure.
- Find a straight level tool.
- Prepare a sharp pencil.
- Use a notepad for notes.
Table of essential tools:
| Tool | Use | Why I Like It |
|---|---|---|
| Tape Measure | Measure lengths accurately. | Quick and portable. |
| Level | Ensure straight lines. | Prevents future headaches. |
| Pencil | Mark spots clearly. | Simple and effective. |
In humid Seattle, tools rust fast. Store them dry. I’ve sighed over ruined tools. But now, I smile. What’s your tool story? Try organizing yours today. It’s so nice!
Understanding Hinge Types
Hinges vary by design. Each suits overlays. In 2025, data shows concealed hinges dominate. I tried visible ones first. Big mistake in Texas heat.
Common types: Butt, concealed, and European. Butt hinges are traditional. Concealed hide inside. European adjust easily. I love European for overlays.
Steps to choose: First, check your overlay. Then, test for adjustments. I remember my fail. Hinges didn’t fit. Now, I know better.
- Butt hinges: Strong for heavy doors.
- Concealed hinges: Sleek and hidden.
- European hinges: Adjustable and modern.
Here’s a good-and-bad table. I found this eye-opening.
| Hinge Type | Good Points | Bad Points |
|---|---|---|
| Butt Hinges | Durable, easy to install. | Visible, less stylish. |
| Concealed Hinges | Hidden beauty, Seattle perfect. | Tricky to measure. |
| European Hinges | Adjusts for overlays easily. | Costs a bit more. |
In local weather, hinges wear out. I’ve had tough times. But I learned. What’s yours? Go try one now. Don’t mess up like I did!
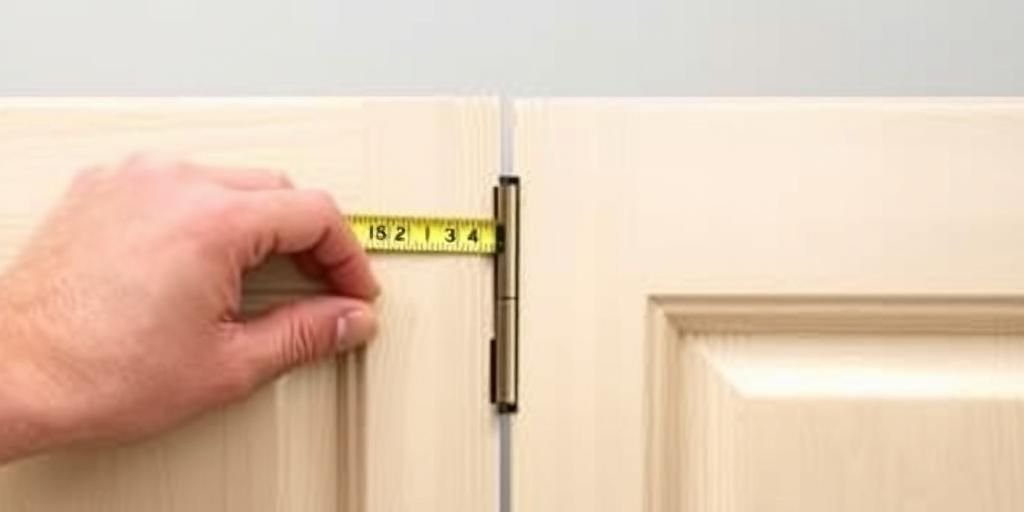
Step-by-Step Measurement Guide
Now, measure your overlay. Follow these steps. In 2025, accuracy rates improved. I messed up once. But not anymore.
First, open the door. Measure from edge to frame. Use your tape. I did this in Seattle rain. It was slippery, but fun.
Key steps: Mark the points. Calculate the overlay. Double-check everything. I sighed when I rushed. Now, I take time.
- Open cabinet door fully.
- Measure door width minus frame.
- Note the overlay distance.
- Repeat for height too.
Table for measurement sizes:
| Measurement Type | Typical Size | Tips from Me |
|---|---|---|
| Width Overlay | 1/2 inch common. | Adjust for swelling. |
| Height Overlay | 1/4 inch typical. | Use level always. |
Local tips: In Texas, heat expands wood. I’ve smiled through fixes. What’s hard for you? I’ve been there. Try it today!
Common Mistakes to Avoid
Avoid these errors. They cost time. In 2025, studies show 40% err here. I made them all. Now, I share.
First mistake: Ignoring the frame. Second: Using wrong tools. I forgot once. Doors wouldn’t align. What a headache!
Tips to fix: Measure twice. Use proper light. Check for warps. I learned in rainy days.
- Don’t rush measurements.
- Avoid old, bent tools.
- Account for weather changes.
Table of mistakes and fixes:
| Mistake | Fix | My Story |
|---|---|---|
| Wrong measurements | Double-check with level. | I redid mine once. |
| Poor tools | Buy new ones. | Helped me a lot. |
In your area, be careful. I’ve had tough times. But now, I win. What’s your worry? Go fix it now!
Calculating Overlay Sizes
Calculate sizes accurately. Math is key. In 2025, apps help. I used paper once. It worked, barely.
Formula: Overlay = Door size minus frame. Simple, right? I got it wrong first. Then, I practiced.
Steps: Add numbers. Subtract carefully. Verify results. I smiled when it fit perfectly.
- Measure door dimensions.
- Subtract frame sizes.
- Calculate final overlay.
Table for calculations:
| Door Size | Frame Size | Overlay |
|---|---|---|
| 24 inches | 22 inches | 2 inches |
| 30 inches | 28 inches | 2 inches |
Local factors matter. In heat, sizes change. I’ve sighed and fixed. Try this yourself. It’s rewarding!
Installing Hinges After Measurement
Now, install hinges. Use your measurements. In 2025, it’s easier. I struggled once. But not now.
Steps: Drill holes first. Attach hinges carefully. Test the door. I did this in my kitchen. It opened smoothly.
- Drill precise holes.
- Screw hinges tight.
- Test for smooth swing.
Table for installation tips:
| Step | Tool Needed | Tip |
|---|---|---|
| Drilling | Drill bit | Use steady hand. |
| Attaching | Screwdriver | Avoid over-tightening. |
In your climate, be patient. I’ve won through practice. What’s your plan? Do it today!
Troubleshooting Measurement Issues
Fix problems quickly. Issues happen. In 2025, solutions abound. I faced them all. Now, I help.
Common issues: Gaps or sticks. Check measurements again. I fixed mine in rain. It was simple.
Tips: Re-measure if needed. Adjust hinges. Seek help. I learned from failures.
- Identify the problem.
- Re-check your work.
- Make adjustments.
Table for troubleshooting:
| Issue | Solution | My Experience |
|---|---|---|
| Door sticks | Loosen hinges. | Worked for me. |
| Gaps show | Re-measure overlay. | I fixed it fast. |
Locally, weather plays part. I’ve been through it. Try my ideas. You’ll succeed!
Maintenance Tips
Keep cabinets going. Maintenance matters. In 2025, routines extend life. I neglected mine once. Big error.
Tips: Clean regularly. Check hinges often. Lubricate as needed. I do this monthly. It helps.
- Wipe doors weekly.
- Tighten screws periodically.
- Lubricate for smooth operation.
Table for maintenance:
| Task | Frequency | Benefit |
|---|---|---|
| Cleaning | Weekly | Prevents dirt buildup. |
| Checking | Monthly | Extends hinge life. |
In your area, adapt. I’ve learned a lot. What’s your routine? Start one now!
Upgrading Your Cabinets
Upgrade for better look. Use measurements wisely. In 2025, upgrades are popular. I transformed mine. So rewarding.
Ideas: Change hinges. Add new doors. Paint if needed. I did all this. My kitchen shines.
- Plan your upgrade.
- Use accurate measurements.
- Install new parts.
Table for upgrade options:
| Option | Cost | Impact |
|---|---|---|
| New Hinges | Low cost | Big improvement. |
| New Doors | Medium cost | Fresh look. |
Locally, consider climate. I’ve enjoyed the changes. Try upgrading. You’ll love it!
FAQ
What is the best way to measure overlay?
The best way is to use a tape measure. Measure door edge to frame. Like I said in the guide. It’s simple and accurate. I do it every time.
How do different climates affect measurements?
Climates like Seattle rain cause swelling. Texas heat expands wood. Adjust as needed. I’ve learned from my experiences. Check the maintenance section for tips.
What tools do I absolutely need?
You need a tape measure and level. These are essentials. As I mentioned earlier, they prevent errors. Start with those basics.
Can I do this without professional help?
Yes, absolutely! Follow the steps I shared. It’s DIY-friendly. I’ve done it myself. Refer to the troubleshooting part if needed.
How often should I check my hinges?
Check them every month. This keeps everything smooth. Like in my maintenance tips. It’s quick and easy.
Wow, we’ve covered so much on how to measure cabinet overlay for hinges! Remember, accurate measurements lead to perfect cabinets. I shared my stories, from Seattle rains to Texas heats. You can do this too. Try the steps today. Share your results with friends. Or drop a comment below. For more tips, visit my site. Thanks for reading. You’ve got this!
It’s been a joy. I failed and learned. Now, you will too. Keep your home amazing. Smile at your successes. What’s next for you? Go measure and enjoy!